

Understanding SI joint pain and how yoga therapy helps
If you’ve been living with a deep ache on one side of your low back or buttock, your body may be asking for some extra care, and there are gentle ways to help it feel better. Many people notice it most when they stand up from a chair, climb stairs or roll over in bed, and sometimes even turning or lifting can set it off. The ache may also travel into the hip or upper thigh, which is why it is often mistaken for sciatica, even when an irritated SI joint is the source. Gentle and restorative yoga for SI joint pain can help you find relief at your own pace, with poses that keep your pelvis steady and let your body feel supported.
The sacroiliac (SI) joints connect the base of your spine to your pelvis, one on each side. They barely move, and their main job is stability, since they carry the weight of your upper body down into your legs. These joints are small, but they play a powerful role.
When the SI joints are flared or irritated, deep or lopsided stretches can pull the joint further out of balance and make pain worse. Your nervous system reads that strain as danger, so the muscles around the joint tighten to protect it, and this guarding can contribute to the discomfort. But please don’t give up on stretching just yet, because yoga therapy can help break that cycle. As a certified yoga therapist (C-IAYT) who has lived with chronic low back pain myself, I use the poses below with my own clients to soothe and strengthen tender SI joints. They all come from my book, Yoga for Low Back and Hip Health.
My method starts by soothing the flare and calming the nervous system with gentle movement, props and poses that keep both sides of the pelvis even. Then we strengthen and stabilize the joints to reduce weakness and instability.
Steady and easy: harmony for a sore back
Yoga therapy encourages finding balance and harmony in the body, and that idea matters a great deal when you live with chronic pain. We can look to the Yoga Sutras, a text written well over a thousand years ago, to guide our therapeutic yoga practice. Sutra 2.46, sthira sukham asanam, shows us the way. Edwin F. Bryant translates it as “posture should be steady and comfortable,” and Mukunda Stiles translates it as “yoga pose is a steady and comfortable position.”
Sthira means steady and sukham means comfortable, so a therapeutic pose holds both qualities in balance. With SI joint pain, too much effort turns into gripping, and a gripping back stays guarded. Too little effort lets you sink into a deep stretch with nothing holding the joint in place, so the goal is a pose that feels both supported and comfortable.
A simple breath check can guide you toward that balance in every pose. Smooth, slow breathing tells you that the body is settling into the stretch. Breath that turns tight, shallow or held tells you to ease out of the posture, lessen the time held or skip it during a flare-up. This is the same balance I look for with my yoga therapy clients, where steady support and comfort let a painful body begin to release.
This is where sthira sukham asanam becomes practical. When a pose is steady and comfortable, your body receives a message that it is supported and safe enough to let go of the tension it has been holding around the sore joint, sometimes for years. Slow breathing, firm support from props and a quiet space all send that same clear message, which is why the supported restorative poses below matter as much as the movements.
Before you begin
While practicing these poses or any other sequence, move slowly and listen to your body. A mild stretching sensation, and the feeling of reaching the first place of resistance, shows you where you are holding tension. Anything sharp, burning, tingling or electric is a signal to come out of the pose, because the body will always let you know how far to go.
When to see a doctor
SI joint pain is easy to confuse with other low back and hip problems like a herniated disc or sciatica, so a diagnosis from your doctor or physical therapist helps you practice safely. Check with them before you start this or any new exercise program.
Stop practicing and see your doctor if you notice:
- Tingling, numbness, burning or electric pain running down your leg
- Pain that gets worse with practice instead of easing
- Pain that wakes you at night or hasn’t improved after a few weeks
Get medical care right away if you have:
- Numbness in your groin or inner thighs
- New trouble controlling your bladder or bowels
- Leg weakness that is getting worse
- Back pain with a fever, or pain that started after a fall or accident
7 gentle yoga poses for SI joint pain
Practice these in order as one routine that takes about 30 minutes, or do poses 1, 2, 3 and 7 if you’re short on time for a 10-minute version. Aim for 3 to 4 times a week, since a short routine you do often beats a long one you skip.
You’ll need a bolster or a few folded blankets, plus two extra blankets or towels. You can practice on a mat, the floor or a bed.
1. Reclined Knee Hug
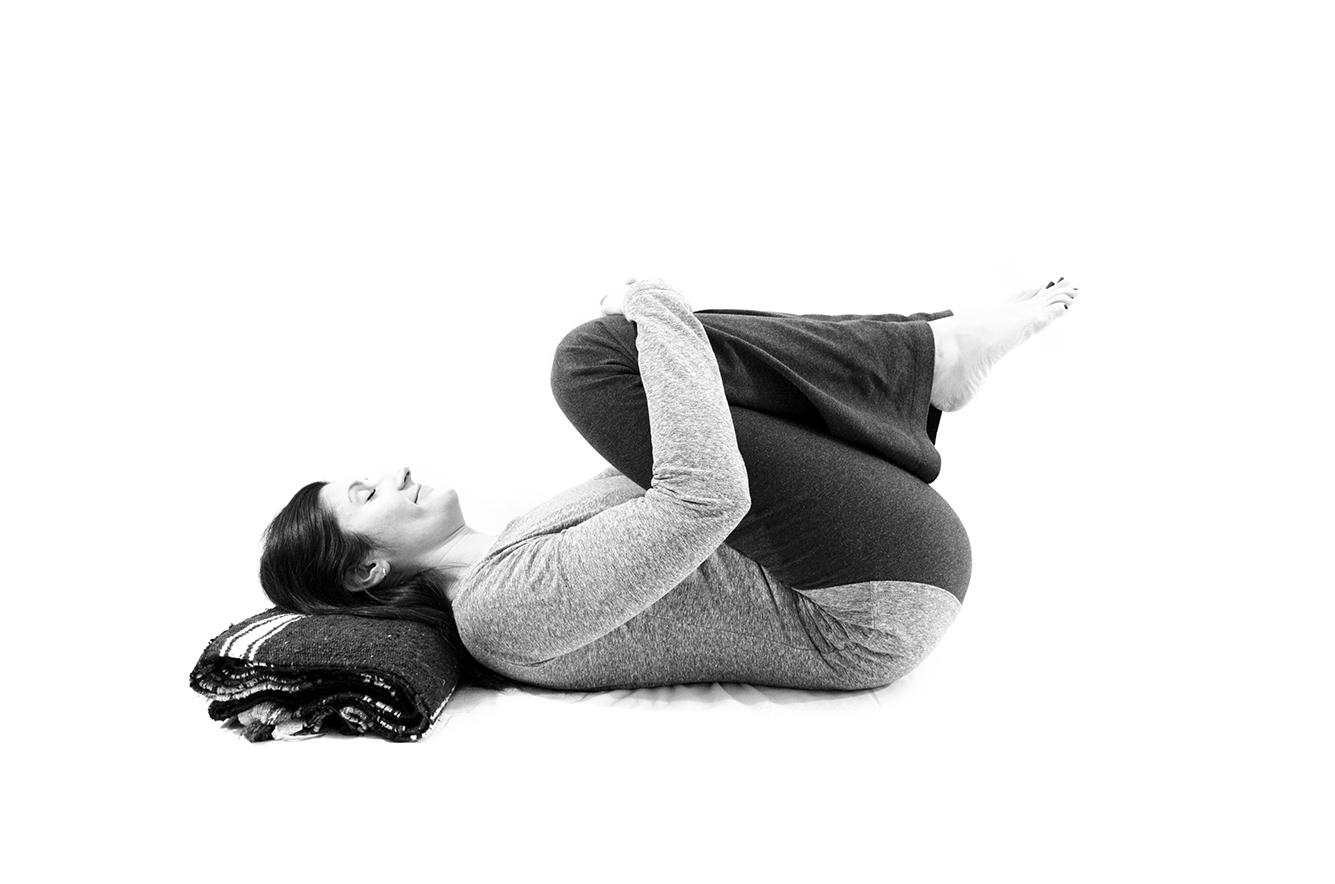
This is a gentle way to lengthen the low back and ease the compression that builds up from sitting.
- Lie on your back with your knees bent and feet flat. Place a folded blanket under your head.
- Lift both knees and hug them toward your chest. Hold over or under the knees.
- Gently press your low back toward the floor. Soften your shoulders, neck and face.
- Breathe slowly for 10 to 20 breaths.
For your SI joint: hug both knees together so the pelvis stays even.
2. Pelvic Tilts


This four-part breath releases the low back. I also use it to strengthen a weak SI joint.
- Lie on your back with no support under your head. Bend your knees with feet hip-width apart and toes pointing forward.
- Walk your feet back until your fingertips brush your heels.
- Inhale and gently arch your low back, keeping your hips on the floor.
- Exhale and press your low back into the floor, drawing your navel toward your spine.
- Inhale, ground your feet and lift your hips.
- Exhale and lower your hips back down.
- Repeat for 10 to 20 rounds. To finish, hug your knees in for 5 to 10 breaths.
For your SI joint: keep the movement small and steady. Lift your hips only as high as feels stable, and keep your knees from falling in or out.
3. Supported Bridge With Bent Legs
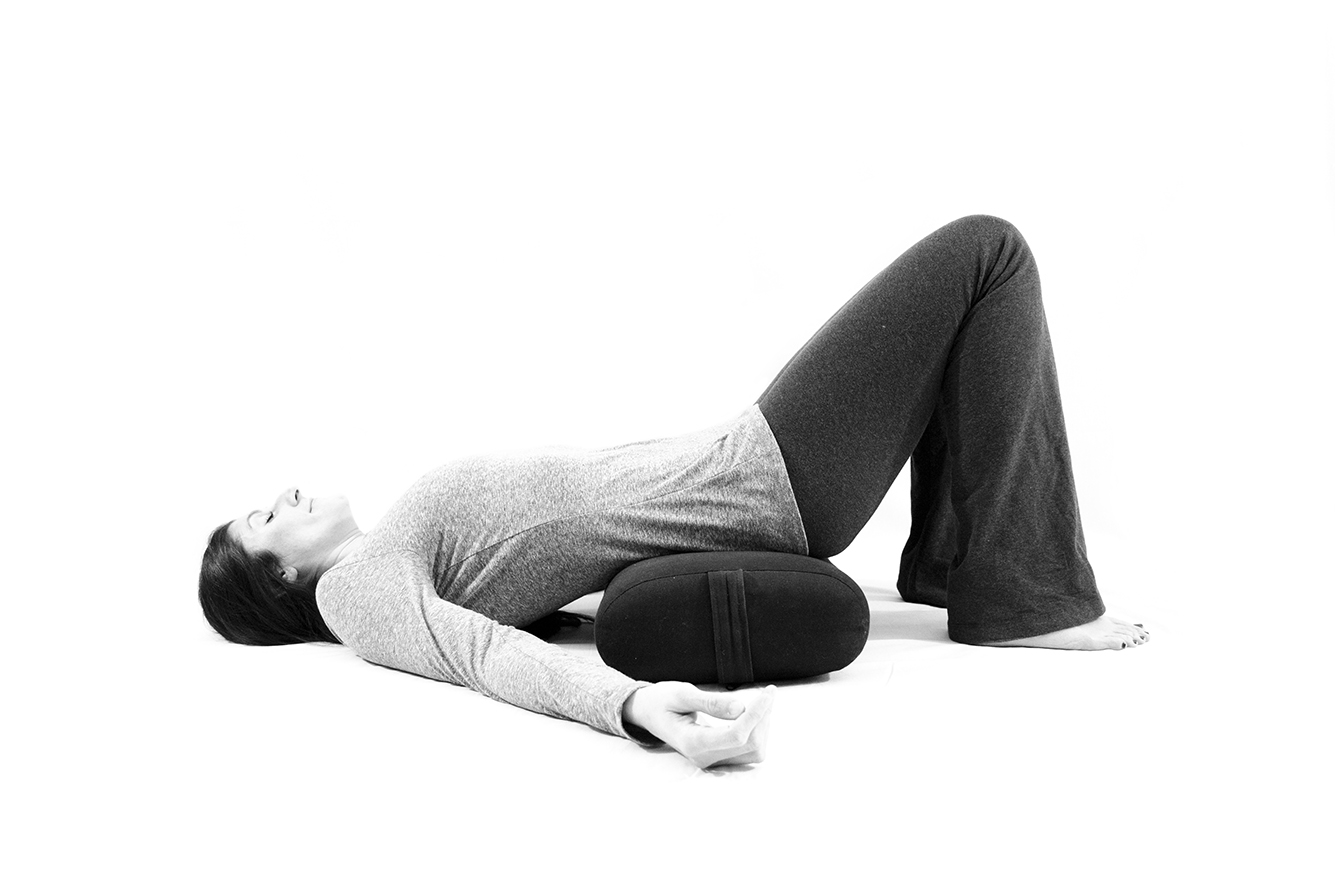
A bolster under your sacrum lets the muscles around the SI joint rest. This pose also counters tension from sitting all day.
- Lie on your back with no support under your head and a bolster beside you.
- Bend your knees with feet hip-width apart. Walk your heels back so your ankles sit under your knees.
- Inhale, press into your feet and lift your hips. Slide the bolster under your low back and sacrum.
- Lower your hips onto the bolster. If it feels like too much, use a folded blanket instead.
- Rest your arms by your sides or open them like wings.
- Breathe into your belly, ribs and chest for 3 to 5 minutes.
- To come out, lift your hips, slide the bolster away and lower slowly. Hug your knees in.
For your SI joint: keep both feet pressing evenly into the floor the whole time.
4. Cat/Cow Tilts
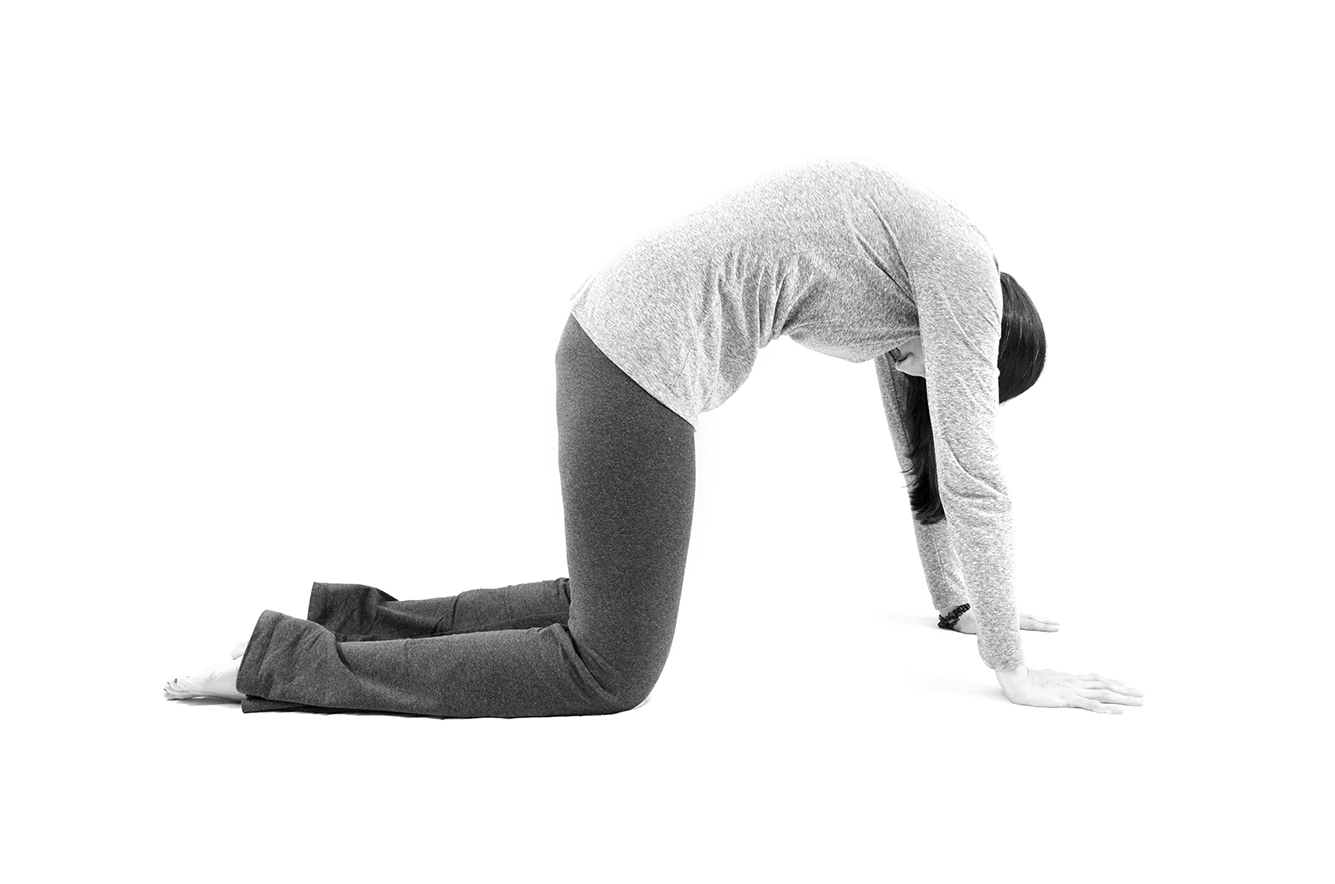
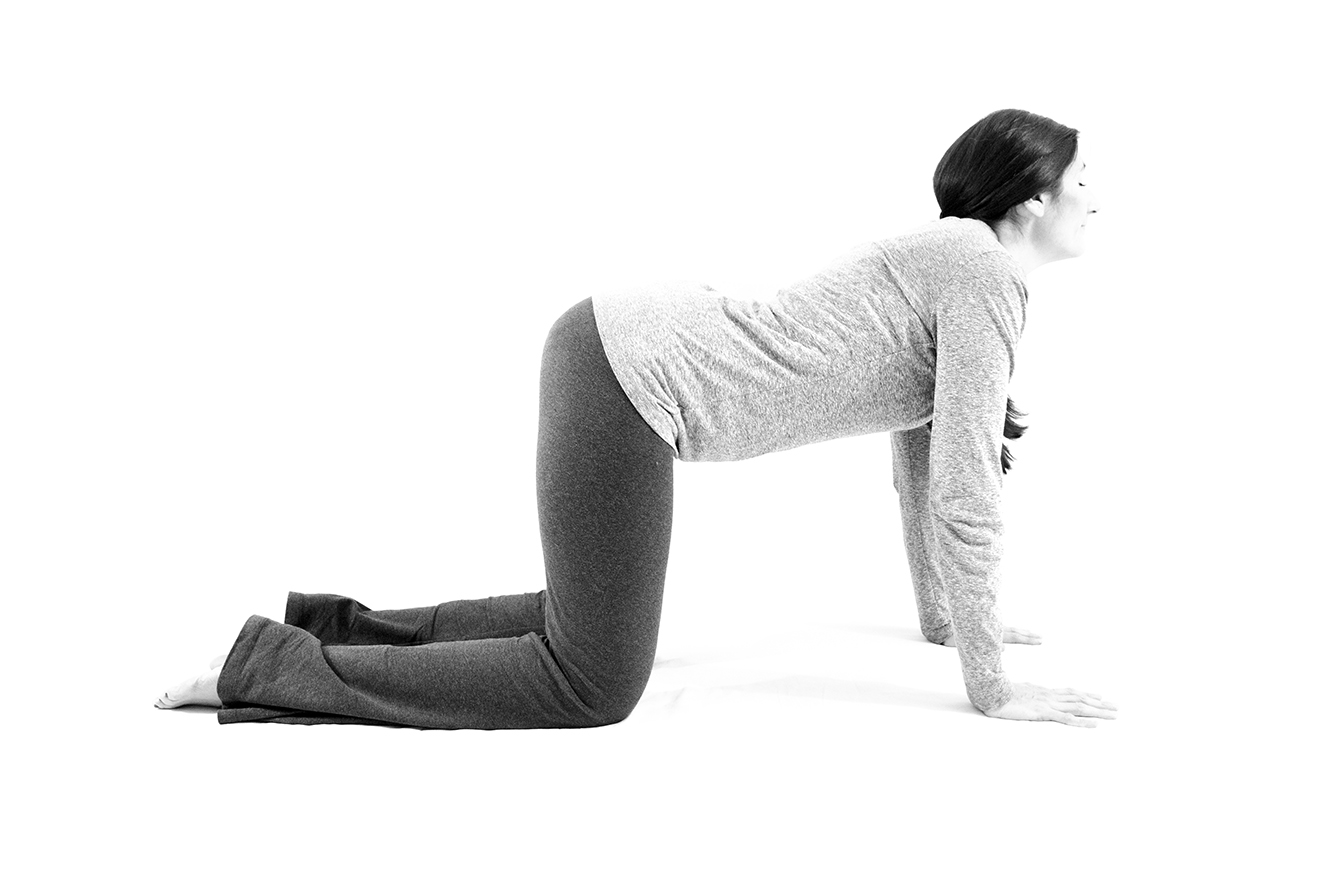
This increases spine flexibility and mobility, moving the spine forward and back while the pelvis stays supported on both knees.
- Come onto your hands and knees. Stack your wrists under your shoulders and knees under your hips. Pad your knees with a blanket if needed.
- Inhale, drop your belly and gently arch your back. Look up if it’s comfortable for your neck.
- Exhale, round your back and look down.
- Repeat for 10 to 15 rounds.
For your SI joint: let the movement come from your spine. Keep your hips steady over your knees.
5. Supported Child’s Pose
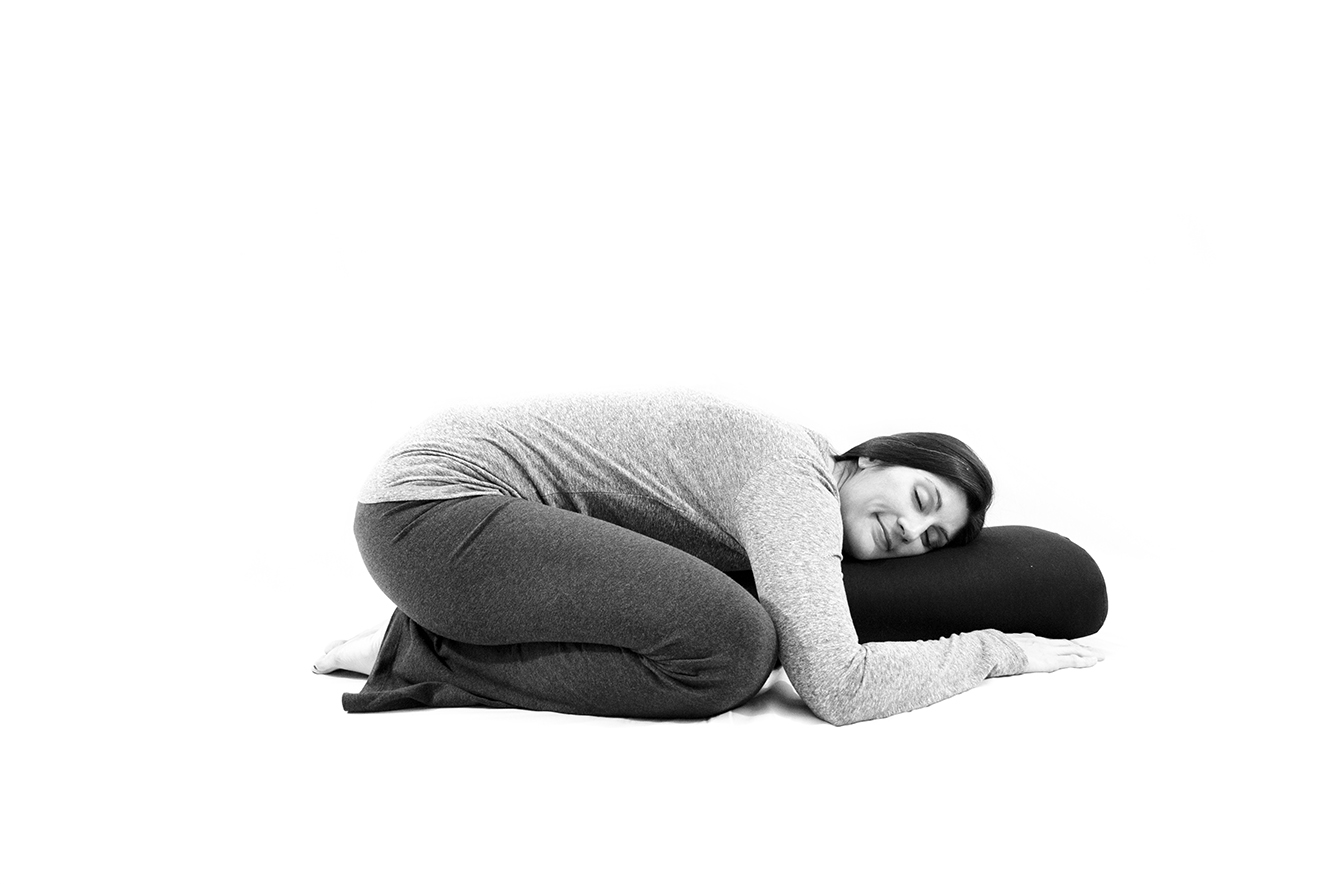
This is the most comforting pose in the routine. It gently stretches the back and hips and calms the nervous system.
- Start on your hands and knees with a bolster lengthwise in front of you.
- Open your knees to the edges of the bolster and bring your big toes together. Sit back toward your heels.
- Lay your chest and belly down on the bolster. Add folded blankets on top until your chest is level with your hips.
- If your knees hurt, place a folded blanket on your heels before you sit back.
- Turn your head to one side for 3 minutes, then the other side for 3 minutes.
For your SI joint: keep your knees at the width of the bolster. Opening them wider stretches the hips more than an irritated SI joint usually wants.
6. Reclined Leg Rest
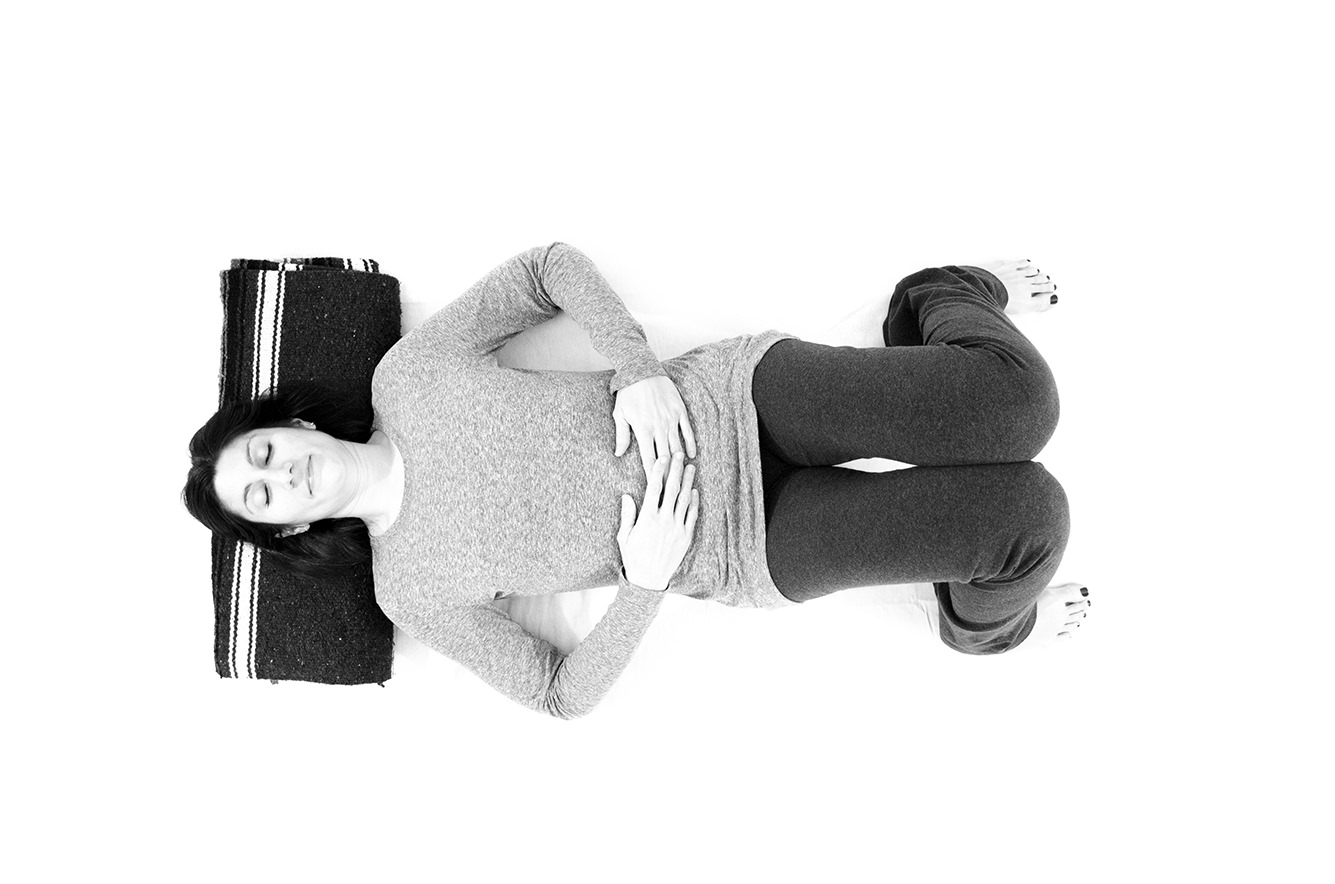
In this pose, gravity helps the pelvis settle back toward neutral, and tension in the low back melts away.
- Lie on your back with a folded blanket under your head.
- Hug both knees in for 5 breaths, lengthening your tailbone.
- Exhale and set your feet down wider than your hips, toes in line with heels. Let your knees rest against each other.
- Rest your hands on your belly. Picture your thighbones settling into your hip sockets.
- Breathe for 5 to 10 minutes.
For your SI joint: with your knees leaning on each other, neither hip has to work. This is a good pose to return to on a flare day.
7. Supported Final Relaxation

End here every time. Rest lets the changes from the other poses settle in.
- Lie on your back with a folded blanket under your head and a bolster under your knees.
- Let your heels rest on the floor and your legs relax.
- Rest your hands on your belly or let your arms fall open.
- Breathe slowly for 5 to 8 minutes.
- To come out, wiggle your fingers and toes, hug your knees in and roll to one side before you sit up.
For your SI joint: the bolster under your knees takes pressure off your low back and sacrum.
What to avoid with SI joint pain
An irritated SI joint needs stability more than flexibility, so these are the movements I steer clients away from, especially during a flare.
- Deep one-sided hip openers. Full pigeon and deep lunges pull one side of the pelvis much harder than the other, so the supported or reclined versions are a gentler choice.
- Forcing your hips square. In standing poses like Warrior I, allow your back hip to turn slightly rather than cranking both hips forward.
- Deep seated twists with the pelvis locked. Keep twists gentle and let your hips move a little along with your spine.
- Pushing to your end range. The ligaments around the SI joint hold it steady, and overstretching them can make the joint less stable.
- Wide-legged poses. Wide-legged forward folds and wide stances spread the two sides of the pelvis apart.
- Long single-leg balances. Poses like Tree put all your weight through one SI joint, so keep a hand on the wall or skip them until the pain settles.
This doesn’t mean you can never do these poses. You can bring some of them back slowly once your pain calms down and your pelvis feels stable.
Frequently asked questions
Is yoga good for SI joint pain?
Gentle and restorative yoga helps many people with SI joint pain. Research on the SI joint itself is limited. Yoga is well studied for chronic low back pain, though, and the American College of Physicians suggests trying it before medication. The key is choosing even, stable poses over deep stretches.
Is pigeon pose bad for SI joint pain?
Full pigeon can be too much during a flare, since it stretches one side of the pelvis deeply. A propped-up version is gentler. See my guide to supported pigeon pose and ease in only when your pain has settled.
Can I do these poses during pregnancy?
SI joint pain is common in pregnancy, as hormones loosen the pelvic ligaments. Many of these poses can be adapted, but check with your doctor first. My book Yoga for a Peaceful Pregnancy has safe versions for each trimester.
Next steps
Want the full program?
These seven poses come from my book, Yoga for Low Back and Hip Health. It has more than 40 poses and over 300 photos to guide you. It also includes 15 complete sequences for low back pain, hip tension, sciatic pain and core strength.
Want help with your own body?
Every SI joint is different. In live, private online sessions, I’ll build a custom therapeutic practice around your pain, your history and your goals.
Not ready for either?
Start with a free guided breathing practice or meditation. It’s a gentle way to calm your nervous system on a painful day.
